
A UV lamp is the heart of a UV water purification system. Without the UV-C light radiating from the lamp, microbiological contaminants can thrive in a water supply and cause severe damage to one’s health. As UV lamps continue to operate, their effectiveness fades until they can no longer adequately deactivate bacteria and viruses in water. Consequently, replacing the UV lamp before it becomes ineffective is key to maintaining the health of your home. Below you can find information about how, when, and why to replace a UV lamp.
What is a UV lamp?A UV lamp is an ultraviolet light source that deactivates bacteria and viruses in drinking water. To power a UV lamp, mercury beads are heated into a vapor that powers the lamp. The frequency of UV light emitted from a UV lamp is known as the Germicidal Frequency, around 254 nanometers. At this frequency, UV light can penetrate the cell walls of bacteria and viruses to disable their DNA. Once disabled, these microbiological contaminants cannot reproduce, and they are no longer a threat.
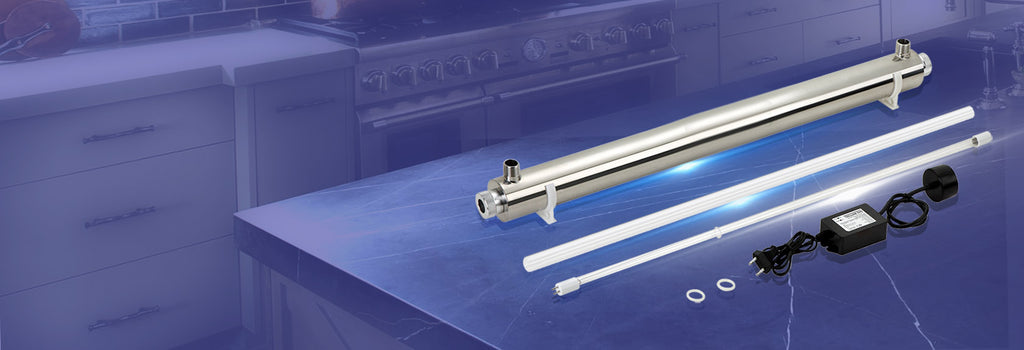
What do I need to replace a UV lamp?
Replacing a UV lamp is a simple procedure and does not require any specialized tools. To properly perform a UV lamp replacement, you will need the following items:
- New UV lamp
- New O-rings
- Cleaning cloth
- Vinegar
- Latex gloves
- Bucket
Can I clean my UV lamp?
Unlike the quartz sleeves in a UV system, the UV lamp should not be cleaned. Rather, it must be replaced once each year. Quartz sleeves, on the other hand, should be cleaned each time a UV lamp is replaced and replaced every 2 to 3 years.
Learn more: How to clean a quartz sleeve
How often does a UV lamp need to be replaced?UV lamps should be replaced once every 12 months. UV lamps have a lifespan of approximately 9,000 hours. Calculated out, this means the lamp can operate for about 375 days before requiring a replacement. Since the lamp is technically good for about a year and a week, this does provide you with a little wiggle room in the event you forget to order a replacement lamp in time. However, it is always wise to keep an extra lamp on hand or to set a reminder to order a new lamp a month before your old one expires. After 9,000 hours, disinfection will no longer occur, and you will no longer be protected from any microbiologically unsafe content present in your water. After the UV lamp burns out, you are simply passing water through a tube of glass inside a pipe.
Whenever you are replacing your UV lamp, it is also important to replace the UV system’s O-rings as well. O-rings ensure a leak-free and watertight seal. However, over time they will weaken and degrade. Installing new O-rings when you replace your lamp ensures that water cannot escape from the chamber and damage any of the system’s electrical components.
When a UV lamp needs to be replaced, the alarm on the UV system will beep. The alarm is set to go off at 12-month intervals. When a UV system’s alarm is reset, it will no longer beep to remind you to change out the bulb.
However, much like the indicator light on the refrigerator telling you to change the filter, some people will turn off the alarm on the ballast to quiet it from beeping. Unless you have actually replaced the UV lamp with a replacement bulb, this is a bad idea for two reasons. First, the lamp will continue to degrade in its intensity. It will continue to lose efficiency and be ineffective long before the alarm goes off 365 days later. Additionally, when you don’t replace the UV lamp, the UV system’s ballast will work harder and harder to maintain the intensity of the ultraviolet wavelength. Without the mercury to assist, the system overworks itself trying to produce the same UV dosage. This puts unnecessary strain on the system. Whenever a system strains to perform its intended function, you risk damaging the system and seeing a premature reduction in overall performance. So, for both your safety and the protection of the UV system, always replace your lamp when the lamp replacement alarm is triggered.
Learn more: How UV water purifiers work | How to remove bacteria from drinking water
How to replace a UV lampInstalling a replacement lamp each year is essential in keeping your family safe from microbiological contaminants in water. To ensure proper installation, follow the below steps carefully.
1. Shut off your home’s water supply.
To avoid water from leaking during lamp replacement, ensure that your home’s water supply is turned off for the duration of the installation.
2. Unplug the UV system.
A UV lamp is dangerous to touch and look at while powered on. Ensure that the lamp is unplugged and cool before you begin the new lamp’s installation. If you are uncertain about any steps during the installation process, consult a professional to assist you.
3. Allow the UV system to sit.
When a UV lamp is powered on, it generates heat. After unplugging the UV system, let it sit for 10 to 15 minutes to cool off.
4. Remove the protective cover and lamp plug.
Push in the tabs at the top of the system to remove the protective cover, also known as the safety cap. At this stage, you may also remove the lamp plug. Ensure that you do not disconnect any wires during this step. The connection on your system may look different than as described. Consult with your owner’s manual for the appropriate steps for this stage.
5. Remove the UV lamp and sleeve from the chamber.
Disconnect the lamp power connection and pull the lamp out. Remove the gland nuts and remove the sleeve. Water will exit the system as you remove the sleeve, so you may wish to have a bucket ready.
6. Install the new O-rings onto the sleeve.
7. Install the new UV lamp into the assembly.
At this stage, put on gloves to protect the new or cleaned sleeve from smudges. Position the sleeve, place the O-rings, and secure the sleeve with the gland nuts. Some UV systems have the lamp and sleeve as one unit. In others, the sleeve installs separately. Consult with your owner’s manual for exact instructions for your model.
8. Insert the new lamp and sleeve into the system.
Once sleeve is in place and secured, insert the lamp and make the connection with the power supply. Ensure that you continue wearing gloves for this step.
9. Replace the prefilter.
UV systems require a 5-micron prefilter. Now is a good time to replace the filter as well.
10. Turn your home’s water supply on and check for leaks.
Run water through the system, making sure the performance is unaltered and there are no leaks. As always, refer to your manufacturer’s instructions to check for routine disinfection and maintenance procedures.
Keep in mind, different UV systems are configured differently. This may require you to take different steps to extract the sleeve and lamp during replacement. However, whenever you are replacing your UV lamp, you should always take the opportunity to clean the quartz sleeve and replace the O-rings.
How to dispose of an old UV lampAn old UV bulb should be discarded at your nearest recycling solution. If there are no recycling locations near you, your state may allow UV bulbs to be thrown away in the regular trash if sealed in a plastic bag. If neither of these options are available to you, seek a local hazardous household waste facility to discard your old UV lamp.
Common UV lamp problemsIf your UV system encounters problems after installing the new lamp, there are solutions you can attempt for each problem.
UV lamp does not power on
If the lamp does not power on after installing a fresh lamp, inspect for two problems.
- Check the lamp connection to ensure it is connected properly.
- Sometimes new lamps will need a little help to start. Do a "Hard Restart" by unplugging the controller for 5 seconds. As you plug the controller back in, hold the reset button on the controller and hold it for a few seconds. Often this will help the lamp light up.
- Review the troubleshooting section of your manual.
UV System is leaking
A leaking UV system is most likely caused by an improperly sized or improperly seated O-ring. To ensure an O-ring is the correct size, purchase directly from the UV system manufacturer. If the O-ring is even slightly too large or small, the system can cause damage from leaks.
UV system’s alarm is beeping
If the alarm on your system goes off after replacing the lamp, this is likely a problem with either the bulb itself or the ballast. With a new bulb, you are most likely dealing with a bad ballast. In this case, replacing the ballast will resolve the problem. If the bulb is not new and the ballast is working properly, the bulb must be replaced. Be sure and consult your owner’s manual to determine what the alarm can mean. Many systems have a digital alphanumeric reading that provides the error. If your system is not equipped with a digital reading, the owner's manual should provide guidance.
Learn more: How to clean a UV quartz sleeve
If you have any additional questions, please do not hesitate to contact us.


