

A water softener is a whole-house water treatment system that reduces hardness by removing dissolved calcium and magnesium from the water supply. A traditional salt-based water softener does this through cation exchange, a form of ion exchange in which negatively charged resin beads capture positively charged hardness ions and release sodium or potassium ions in their place.
What does a water softener do in everyday terms? It helps prevent the mineral scale, cloudy glassware, soap scum, poor lather, and recurring appliance buildup associated with hard water. Because the system treats water as it enters the home, softened water can be supplied to showers, sinks, laundry equipment, water heaters, and other water-using appliances.
A water softener is not the same as a general water filter. Softening targets hardness minerals, while filters may be designed to reduce sediment, chlorine, tastes, odors, microorganisms, or specific contaminants. A home can need both softening and filtration depending on its water chemistry. This guide explains hard water, the parts of a softener, how ion exchange and water softener regeneration work, system benefits and types, installation, maintenance, and how to choose the right unit.
If you have verified hard water or routinely deal with scale and soap-related problems, a properly sized water softener may make cleaning easier and help protect plumbing fixtures and water-using equipment.
What is Hard Water?
Hard water contains elevated levels of dissolved minerals, primarily calcium and magnesium. Water can pick up these minerals as it moves through soil and rock before reaching a well or municipal supply. Hardness is generally an aesthetic and operational concern rather than a health concern, but it can cause scale in plumbing and water heaters and interfere with soap and detergent performance.
Laboratory reports commonly express hardness as milligrams per liter (mg/L) as calcium carbonate. For typical water, 1 mg/L is approximately equal to 1 part per million (ppm). Water-treatment equipment often uses grains per gallon (gpg); 1 gpg equals approximately 17.1 mg/L as calcium carbonate.
The U.S. Geological Survey provides these general classifications:
• Soft: 0-60 mg/L, or approximately 0-3.5 gpg
• Moderately hard: 61-120 mg/L, or approximately 3.6-7.0 gpg
• Hard: 121-180 mg/L, or approximately 7.1-10.5 gpg
• Very hard: More than 180 mg/L, or more than approximately 10.5 gpg
These ranges are useful references, but there is no single treatment threshold that fits every household. Some homeowners consider treatment at moderately hard levels because of spotting or soap scum, while others begin treatment when scale becomes persistent or equipment manufacturers specify a hardness limit.
Test both hardness and iron before selecting or programming a system. A utility report may provide a general hardness range for municipal water, but a test from the home gives better information for sizing. Private-well users may benefit from a broader laboratory analysis because hardness can occur alongside iron, manganese, pH issues, sediment, or other water-quality concerns. Water Testing and Monitoring options range from simple hardness strips to laboratory test kits.
Learn more: What is hard water?
What are the Main Parts of a Water Softener?Most salt-based water softeners have three central components: a mineral tank, a brine tank, and a control valve. The complete installation also includes a bypass valve, inlet and outlet connections, a drain line, and a brine connection.
Mineral tank
The mineral tank is where water softening takes place. It contains water softener resin, usually small cation-exchange beads with fixed negative charges. As hard water flows through the resin bed, calcium and magnesium ions attach to the beads. The treated water exits the tank and flows into the home’s plumbing.
An internal distributor helps spread the flow through the resin and directs water during normal service and regeneration. The tank must contain enough resin to provide the required capacity and service flow rate without causing excessive pressure loss.
Brine tank
The brine tank stores salt and water used to make a concentrated brine solution. During water softener regeneration, the control valve draws this solution into the mineral tank. The sodium or potassium ions in the brine displace accumulated calcium and magnesium from the resin so the beads can soften water again.
Salt does not function like sediment or carbon filter media. Its primary job is to regenerate the resin. Without enough usable salt or potassium chloride in the brine tank, the resin eventually reaches capacity and the system can no longer consistently reduce hardness.
Control valve
The control valve directs water through each service and regeneration stage. Many modern valves use a meter to track water use and begin regeneration after a calculated amount of capacity has been consumed. Other controls regenerate on a fixed schedule. Metered, demand-initiated regeneration generally responds more closely to actual household use.
The valve is programmed using information such as water hardness, usable capacity, and reserve capacity. If dissolved iron is present and the softener is verified for limited iron reduction, the hardness setting may need to be adjusted according to the manufacturer’s instructions.
Other connections and components
• Bypass valve: Lets water flow around the softener during service or maintenance.
• Inlet and outlet: Connect the system to the main water line. Reversing them can prevent proper operation.
• Drain line: Carries backwash and regeneration wastewater to an approved drain with the required air gap.
• Brine line: Connects the brine tank to the control valve so brine can be drawn and the tank can be refilled.
• Overflow connection: Provides an emergency route for water if the brine tank overfills; it is separate from the pressurized control-valve drain line.
.
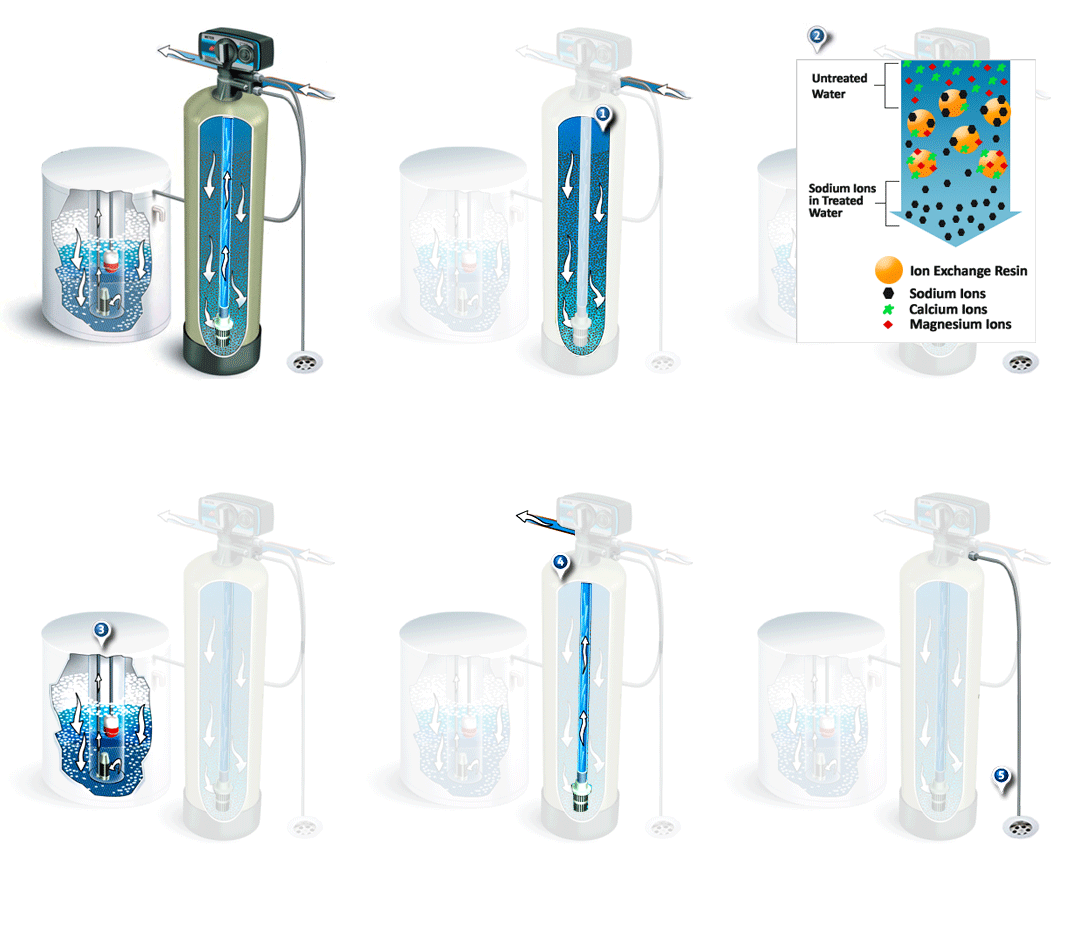
In plain language, a water softener exchanges the minerals that make water hard for sodium or potassium ions that do not form the same type of scale. The technical name for this process is cation exchange.
1. Hard water enters the mineral tank
Water from the main supply flows into the mineral tank and through the bed of water softener resin. The resin beads carry fixed negative charges. Calcium and magnesium are dissolved in water as positively charged ions, or cations.
2. The resin captures hardness minerals
The resin has a stronger attraction to calcium and magnesium than to the sodium or potassium initially held on the beads. As water passes through, hardness ions attach to the resin and sodium or potassium ions are released into the water. This ion exchange produces softened water that continues through the outlet to the home.
3. The resin reaches its usable capacity
Every resin bed can hold only a certain amount of hardness. The control valve estimates when the available capacity is nearly used based on programmed hardness, measured water use, and reserve settings. The system then schedules a regeneration cycle, often at a time when household water demand is low.
4. The system regenerates the resin
Although valve designs differ, water softener regeneration generally includes four primary stages:
1. Backwash: Water flows through the resin bed to expand it, release trapped particles, and carry debris to the drain.
2. Brine draw and slow rinse: Concentrated brine flows through the resin. Sodium or potassium ions displace the captured calcium and magnesium, which are sent to the drain.
3. Fast rinse: Fresh water settles and rinses the resin bed, removing remaining brine and hardness minerals.
4. Brine-tank refill: The valve adds a measured amount of water to the brine tank so it can dissolve salt and prepare brine for the next cycle.
After regeneration, the resin is ready to resume softening. Some valves use co-current, or downflow, brining, while others use counter-current, or upflow, brining. Efficiency depends on the complete system design and programming, so compare verified salt and water efficiency data rather than relying on the flow direction alone.

What Does a Water Softener Remove?
A standard salt-based water softener is designed to reduce hardness. It should not be described as a complete contaminant-removal system.
Typically removes or reduces
• Calcium: One of the primary minerals responsible for hardness and scale.
• Magnesium: The other main hardness mineral addressed by cation-exchange softening.
• Limited dissolved iron or manganese in some applications: Certain resins and systems may reduce small amounts of positively charged, dissolved iron or manganese. The allowable concentration, required pretreatment, and maintenance vary by product. Follow verified manufacturer claims rather than assuming every softener can treat iron.
Oxidized or particulate iron can foul a standard resin bed and is usually better handled with treatment designed for the iron form and concentration. Test the water before choosing a softener for a private well.
Does not typically remove
• Sediment, sand, or silt
• Chlorine, chloramine, tastes, or odors
• Bacteria, viruses, or cysts
• Nitrate, arsenic, fluoride, or many other dissolved contaminants
• Total dissolved solids as a broad category
Those concerns may require sediment filtration, activated carbon, reverse osmosis, disinfection, or another targeted technology. Explore Water Filtration Systems when testing identifies needs beyond hardness. Replacement Filters and Media should also be selected according to the contaminants or operating problems they are designed to address.
Learn more: How to remove iron from well water
What are the Benefits of a Water Softener?Water softener benefits are most noticeable where hardness is high enough to cause recurring scale and cleaning problems. Results depend on the incoming hardness, system size, programming, water use, and maintenance.
Helps limit scale in plumbing and equipment
When hard water is heated or evaporates, it can leave calcium carbonate scale. Reducing calcium and magnesium helps limit buildup on faucet aerators, showerheads, pipes, water-heater components, dishwashers, coffee makers, humidifiers, and other water-using equipment. A softener cannot reverse every existing plumbing problem, but it can reduce the hardness entering the system going forward.
Reduces spots, film, and soap scum
Hardness minerals can remain on sinks, shower doors, tile, dishes, and glassware after water evaporates. They also react with soap to form residue. Softened water can reduce this buildup, making routine cleaning easier and decreasing the need to repeatedly remove mineral deposits.
Improves soap and detergent performance
Calcium and magnesium interfere with lather and consume some of the soap or detergent used for washing. With softened water, soaps generally lather more readily and rinse differently. Follow appliance and product directions when adjusting detergent amounts; using the same quantity as before may create excess suds.
Helps address hard-water laundry problems
Mineral and soap residue can make fabrics feel stiff or look dull. Reducing hardness can improve washing conditions and limit residue, although laundry results also depend on detergent, water temperature, soil level, and washer performance.
These are practical treatment benefits, not guarantees of a specific dollar savings, appliance lifespan, or personal-care result. Test the water and compare the treatment goal with the system’s verified performance.
Learn more: How does reverse osmosis work?

Common signs of hard water include:
• White or chalky scale around faucets, showerheads, or fixtures
• Cloudy spots or film on dishes and glassware
• Soap scum on sinks, tubs, tile, or shower doors
• Soap and shampoo that do not lather easily
• Laundry that feels stiff or appears dull after washing
• Recurring mineral buildup in kettles, coffee makers, humidifiers, water heaters, or other appliances
• Reduced flow at aerators or showerheads because of scale accumulation
These symptoms can suggest hard water, but appearance, taste, and feel cannot establish the exact hardness. Some problems can also have other causes. Cloudy glassware, for example, may result from mineral film or permanent etching, while staining may indicate iron or manganese rather than hardness alone.
Test before you buy: Use a hardness test kit or laboratory analysis before sizing a water softener. Also test iron when it may be present. Accurate results help determine whether softening is appropriate and how the control valve should be programmed.
Types of Water Softeners and Water Conditioners
The phrase “water softener” is sometimes used broadly, but not every scale-control device actually removes hardness. Understanding water conditioner vs. water softener terminology helps set realistic expectations.
Single-tank ion-exchange softener
A single-tank salt-based water softener uses one mineral tank and one brine tank. It produces chemically softened water during normal service but usually cannot provide softened water while the mineral tank regenerates. This common configuration can suit many homes when it is sized for hardness, water use, and peak flow.
Dual-tank water softener
A dual-tank system uses two resin tanks controlled as an alternating pair. When one tank reaches capacity, the other can provide softened water while the depleted tank regenerates. This arrangement is useful where continuous soft water, high daily use, or irregular peak demand makes regeneration downtime undesirable.
Portable water softener
Portable units use a smaller resin tank and are commonly used for RVs, boats, vehicle washing, or other limited-volume applications. Some regenerate with ordinary salt and require manual connections or regeneration steps. Their lower resin volume means they have less capacity and often need more frequent regeneration than a whole-house unit.
Salt-free water conditioner
A salt-free water conditioner is intended to change how hardness minerals form or adhere so scale may be less likely to accumulate. It generally does not remove calcium and magnesium through ion exchange and does not produce chemically softened water. Because hardness remains measurable, use “water conditioner” rather than “salt-free water softener” unless a product has a verified softening claim.
Conditioners may appeal where salt use, regeneration discharge, or space is a concern and scale control is the primary goal. Performance depends on the technology and water chemistry, and pretreatment may be required.
How to compare system types
Consider the tested hardness and iron level, peak flow rate, daily water demand, available installation space, drain access, maintenance preferences, local discharge restrictions, and whether the goal is true softening or scale control. For high hardness or a need for consistently softened water, a salt-based water softener is usually the relevant category. For a narrower scale-control objective, an appropriately specified conditioner may be considered.
Learn more: 14 benefits of having a water softener
Where Should a Water Softener Be Installed?A whole-house water softener is generally installed on the main cold-water line after the home’s main shutoff valve and pressure tank, if present, but before the water heater. This arrangement supplies softened water to the hot-water system and the household fixtures connected downstream.
A typical flow sequence is:
Main shutoff → pretreatment, if required → water softener → water heater and household plumbing
The exact layout depends on the home and treatment plan. Outdoor hose bibs used for irrigation may be bypassed to avoid using softened water and salt capacity where soft water is unnecessary. A drinking-water line may also be planned separately according to household preference and any additional treatment.
Choose a location with:
• An approved drain that can accept the required regeneration flow, with a code-compliant air gap
• A grounded electrical outlet if the control valve requires power
• Room to operate the bypass valve and service the control head
• Clear access to refill and clean the brine tank
• A level, stable surface and adequate vertical clearance
• Protection from freezing, direct sunlight, rain, and temperature extremes
• Plumbing that can support the required service flow without excessive pressure loss
Never connect the drain line in a way that permits wastewater to siphon back into the system. Follow the product manual and local plumbing, wastewater, and electrical requirements.
Learn more: How to prevent limescale buildup in your home | Do I need a whole-house reverse osmosis system?

Learn more: How do septic tanks work? | 5 benefits of having a water softener
Can You Install a Water Softener Yourself?A homeowner with suitable plumbing experience may be able to install a water softener, but the job involves more than connecting two pipes. A typical installation requires shutting off and draining the water line, installing the bypass valve, connecting the inlet and outlet in the correct direction, routing the drain line with an air gap, connecting the brine tank, checking for leaks, and completing the manufacturer’s startup procedure.
Common mistakes include reversing the inlet and outlet, under-sizing connecting pipe, restricting or improperly elevating the drain line, omitting the air gap, confusing the brine-tank overflow with the control-valve drain, using incompatible materials, and placing the unit where it cannot be serviced. Incorrect programming can also waste salt and water or allow hardness through before regeneration.
Professional installation may be worthwhile when the main line must be rerouted, soldering or electrical work is required, the home has a well or complex pretreatment equipment, local permits apply, or an approved drain is not readily available. A plumber or qualified water-treatment professional can also confirm code compliance and proper placement.
Safety note: Always follow the manufacturer’s installation and startup instructions. Comply with applicable plumbing, drainage, backflow-prevention, and electrical codes. If you are unsure how to alter the main water line or provide a compliant drain, hire a qualified professional.
Water Softener Maintenance and RegenerationWater softener regeneration frequency is not universal. It depends on incoming hardness, iron compensation where applicable, household water use, resin capacity, reserve settings, and control-valve programming. A metered system may regenerate only after a calculated volume of water has been treated, while a time-clock system regenerates on scheduled days.
Use this ongoing maintenance checklist:
• Check the salt level: Keep enough approved salt in the brine tank for the next regeneration, following the manufacturer’s recommended level and salt type.
• Look for a salt bridge: A hard crust can form above an empty space, making the tank appear full even though salt is not dissolving into the water below. Break bridges carefully according to the manual.
• Clean the brine tank when needed: Salt impurities and sediment can accumulate over time. Follow the manufacturer’s procedure and avoid damaging the brine well or float assembly.
• Monitor the drain line: Check for kinks, restrictions, leaks, freezing risk, and a secure air-gapped termination. Water should normally flow to the drain only during applicable regeneration stages.
• Confirm the bypass position: The valve should be in service during normal operation. A partially or fully bypassed unit may deliver hard water.
• Verify settings after outages or service: Confirm the time of day, hardness, capacity, reserve, and regeneration settings according to test results and the product manual.
• Test treated water periodically: A hardness test at a downstream cold-water tap can reveal breakthrough, a bypass problem, depleted salt, or a programming issue.
• Maintain pretreatment: Replace sediment or carbon filters on schedule when they protect the softener. Use only compatible cleaners or resin-care products when the manufacturer recommends them.
• Resin Replacement: Under normal residential conditions and with proper maintenance, high quality resin commonly lasts 15-20 years. High chlorine, oxidized iron, or inadequate pretreatment can shorten its lifespan.
Avoid using universal settings copied from another home. Two households with the same number of people can require different programming because their hardness, iron, flow, and water use differ. Efficient operation begins with accurate testing and the valve manufacturer’s instructions.
How to Choose the right Water Softener?Choosing the right water softener starts with water chemistry and household demand, not a one-size-fits-all grain number. Use this buyer checklist to compare systems.
1. Test the water
Measure hardness in gpg or mg/L as calcium carbonate. Test iron and manganese when relevant, especially on a private well. A broader analysis may identify sediment, pH, sulfur odor, nitrate, bacteria, or other concerns that require pretreatment or a separate technology.
2. Determine compensated hardness
Some sizing methods adjust the measured hardness upward when dissolved iron or manganese must also be treated. The compensation factor depends on the system and manufacturer. Only include iron when the selected resin and equipment are verified for the tested form and concentration.
3. Estimate household water use
Daily demand influences how quickly resin capacity is consumed. Actual meter data is best when available. Household estimates should consider the number of occupants and unusual uses rather than relying on bedroom count alone.
4. Check peak service flow
The softener must supply simultaneous fixtures without excessive pressure drop or hardness leakage. Compare the manufacturer’s continuous and peak service flow specifications with the home’s likely demand. A large capacity number does not automatically mean the unit can support a high flow rate. If water flows through the resin bed faster than it was designed to handle, some hardness minerals can pass through untreated, known as hardness leakage.
5. Compare usable capacity and regeneration frequency
Advertised “grain capacity” may be based on a high salt dose that is not the most efficient operating point. Compare capacity at the stated salt setting, expected gallons between regenerations, reserve capacity, and how often the system will regenerate under realistic conditions.
6. Review salt and water efficiency
Look for documented grains of hardness removed per pound of salt and gallons of water used per regeneration. Demand-initiated controls, efficient valve programming, and appropriate sizing can reduce unnecessary salt and water use. Oversizing is not automatically more efficient if the system regenerates improperly or sits too long between cycles.
7. Evaluate the control valve and serviceability
Consider metering method, programming clarity, bypass design, diagnostic features, replacement-part availability, local service support, and warranty terms. A dependable control valve with accessible parts may be more valuable over time than a feature that cannot be maintained.
8. Look for relevant certification
NSF/ANSI 44 establishes requirements for residential cation-exchange water softeners regenerated with sodium or potassium chloride. Depending on the certification and product claims, evaluation can cover hardness reduction, material safety, structural integrity, pressure drop, softening capacity, rinse effectiveness, and brine-system accuracy. Confirm the exact certified model and claims in the certifier’s listing rather than assuming every product from a brand is certified.
9. Account for installation and local requirements
Confirm pipe size, pressure, temperature, drain capacity, electrical access, available floor space, weather protection, and local restrictions on softener discharge. The right system must fit both the water problem and the installation site.
Frequently Asked Questions About Water SoftenersIs softened water safe to drink?
Softened water is commonly used for household drinking, but individual needs vary. Cation exchange adds sodium or potassium while reducing hardness. Anyone with a medically prescribed sodium restriction should seek guidance appropriate to their circumstances and may choose a separate drinking-water treatment or unsoftened tap.
Does a water softener add sodium to water?
Yes, a sodium-regenerated softener adds sodium in proportion to the hardness exchanged. The amount varies with incoming hardness and system operation; it is not the same as adding table salt to the water. Even very hard water typically contains far less sodium after softening than many common foods. Potassium chloride can be used in compatible systems but generally requires a slightly higher dosage than sodium chloride to regenerate the resin effectively, and is 5-6 times more expensive.
Can a water softener and reverse osmosis system be used together?
Yes. A whole-house softener can address calcium and magnesium, while a point-of-use Reverse Osmosis System at the drinking-water tap can reduce a broader range of dissolved substances, including much of the sodium added during softening. System selection should be based on test results and verified reduction claims.
Does a water softener need salt?
A traditional salt-based water softener needs sodium chloride or, in compatible systems, potassium chloride to regenerate its resin. Salt-free conditioners use different technologies and do not regenerate cation-exchange resin with brine.
How often should a water softener regenerate?
There is no universal schedule. Frequency depends on hardness, water use, resin capacity, reserve settings, and any iron compensation. A properly programmed metered valve initiates regeneration based largely on actual demand.
Will a water softener make hard water safe?
Hardness itself is generally treated as an aesthetic and operational issue, not a measure of microbiological or chemical safety. A softener does not make contaminated water safe to drink. Test for the concerns relevant to the water source and use appropriate treatment.
Is a Water Softener Right for Your Home?A water softener is worth considering when testing confirms hardness and your household experiences scale, spotting, soap scum, poor lather, or recurring mineral buildup in water-using equipment. A salt-based water softener uses ion exchange to remove calcium and magnesium, while a water conditioner generally focuses on scale behavior without producing chemically softened water.
Before choosing a system, identify the symptoms, test hardness and iron, estimate household demand and peak flow, and compare properly sized equipment at realistic salt settings. Review efficiency, certification, serviceability, installation needs, and ongoing maintenance rather than choosing by brand, price, or advertised grain capacity alone.
Remember that a water softener addresses hardness. If testing identifies sediment, chlorine, microorganisms, nitrate, arsenic, or other concerns, the home may need additional treatment. Choose the complete solution according to water chemistry and verified system performance.
Learn more: What is a sediment filter?
Learn more: The truth about salt-free water softeners | Water conditioners vs water softeners
If you have questions about water softening or buying a water softener, please do not hesitate to contact us.
You might also like:


Comments
The greatest ion exchange water softener can give families more productive laundry and enjoyable showers while guarding plumbing and water appliances against limescale accumulation. Families that pick the best ion exchange water softener also won’t have to worry about outdated plumbing and fittings.
Do you recommend that the water supply to ice makers bypasses the softener so you don’t get “mushy” ice?
How do I know that my softener is pulling water from the brine tank
I have a new natural gas powered tank less water heater. I live in a very hard water area of LA., Calif. Is it possible to install a ion exchange water softener with a tank less water heater? I know a regular water softener can be paired with a regular 50 gal water heater, but I have not heard whether a waters softener is compatible with a tank less. I am not interested in a water conditioner system. Thanks
We bought a house 4+ years ago that already had a system installed. The first few years I continually contacted the service man every other month in the attempt to have him look at why every morning after the system does a filter discharge we end up with black water in our pipes. He blamed it on someone using water in the wee hours of the morning while the system was in its final phases but we quickly learned that wasn’t the case. So why does this happen and how can I correct it?
I just had a softener installed about 2-3 months ago, I don’t see any water in the salt part of the bason, but in the cylinder inside the basin is a little at the bottom, is this normal? Is there something wrong with my system
We live in a high rise condo which utilizes a water softener system. Whenever maintenance is done on the plumbing system we get deposits of brown and white crystals in the lines which clog the filters in our faucet heads. Is this related to the water softening system? If so, how can it be prevented because it requires plumbers to come to many units to clear the filters. Thanks Andrew
Hello Randy!
Water softeners will run to drain during backwash and fast rinse anywhere from 2 to 4 GPM (depending on the size of the unit). Each cycle will discharge 25 to 50 gallons of water with high levels of hardness minerals and chloride that you may not want just running outside. Not to mention plumbing code may be violated without proper backflow prevention.
The discharge line is pressurized and can run some distance. How far is the softener from the washing machine drain? Even a kitchen or bathroom sink drain will make better connection than running outside.
Hopefully this helps!
You’re very welcome, Tom! We’re glad we could help.
Thanks for sharing this valuable blog. it’s really helpful for increasing our knowledge.